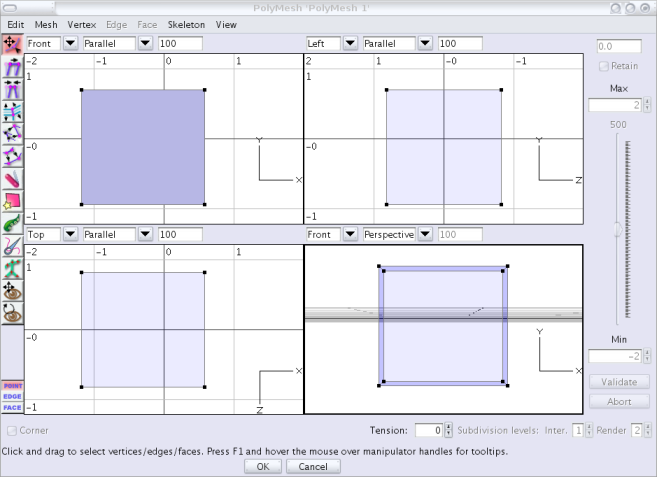
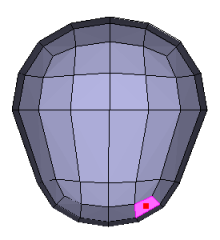
The polymesh editor window looks like the figure below. The tools on the left are similar to those found in the triangle mesh editor window. Menus, however, are a bit different of those found in the triangle mesh editor window. Finally, a combination of slider, values and button on the right allows to choose values for specific commands.
Tools are in fact identical to those found in the triangle mesh editor, except for additional tools (extrude, knife, sew and tentacle).
Generally speaking, tools are used for free movements whereas menu commands are used for constrained movements. Free movements are those which are set the using the mouse in a view. Constrained movements are those which follow a given direction (most often the normal direction). For constrained movements, only the amplitude of the movement is to be set by the user. When the polymesh editor enters amplitude setting mode, the controls at the right of the window (slider, spinners, text fields...) are activated. Moving the slider will vary the amplitude of the movement from Min to Max. These two values can be modified using the lower and upper spinners. Alternatively, a value can be manually entered int the top value field. If the Retain checkbox is checked, then the entered value becomes the default value for subsequent operations. This feature can be useful for applying several similar operations in a row using the same amplitude, e.g. extrude faces successively 4 times with a value of 0.22. Amplitude selection is applied through selecting the Validate button. Abort aborts the current operation. Caution: while in amplitude selection mode, mouse interaction with mesh is still enabled. Limit interaction to operations that do not modify the mesh. If the mesh topology is modified while selecting an amplitude, an error may occur. Safeties will be implemented as the PolyMesh plugins evolves.
The Point, Edge and Face buttons at the bottom left of the window are used to change selection mode, as in the triangle mesh editor window. There are, however, keyboard shortcuts to quickly switch to a given selection mode. These shortcuts are 'p' (or 'v'), 'e' and 'f' (provided shortcuts weren't modified using AoI editable keystrokes feature).
There is another handy feature which is triggered using the S key. If you are editing a smoothed mesh, you may notice that smoothing may cause slowdown for real time operation like extrusion, bevel, etc. This is especially true for complex meshes. Hitting the S key disables smoothing so that mesh display operations are much faster. This feature can also be used to know how the mesh looks like when before smoothing. Hitting the S key again brings back smoothed display.
In addition, the poly mesh editor provides manipulators to easily move, scale and rotate the current selection. Manipulators are discussed at the end of this section.
Finally, some important settings can be changed using several widgets at the bottom of the window. The available settings may change depending on the editing mode currently selected. Be sure to read the relevant sections to find out what these widgets are for.
Tools
Extrude tool. Using this tool in edge or face mode, you can pick the selected items and extrude them using the mouse. Newly created items positions follow the mouse location. Extrusion can be applied to individual items or selection as a whole (double-click on icon for options). This tool does not operate in point mode. In edge mode, only boundary edges can be extruded.
Knife tool. The knife tool allows to "cut in" new edges. Select the knife tool and click and drag across the edges to cut. A new vertex is placed at each intersection between the line drawn and the edges that border at least a face facing the screen. Release the mouse to validate the cuts. More cuts can be subsequently achieved if the Ctrl key is held on while releasing the mouse. Drag the mouse again to draw a second line. New lines can be added while the Ctrl key is held down. Releasing the mouse without having the Ctrl key pressed ends the cut. If you forget to release the Ctrl key and want to terminate the cut, simply click anywhere near the least point. If you want to also cut the edges at the back, keep the Shift key depressed while cutting edges.
If there is an initial selection, the knife tool only cuts the selected edges, ignoring the non selected ones. Here again, only "front" edges can be cut, except if the Shift key is held down. Be sure to cancel any selection if need be in between cut operations.
Limitations: an edge may only be cut once. If the same edge is crossed by several lines, only the latest cut is considered.
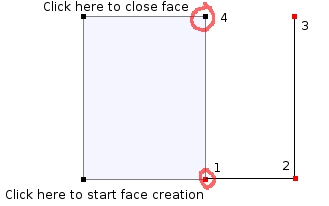
Create Face tool. This tool allows to draw faces rather than generate them through box modelling. Face can only be added to boundaries of an existing mesh. Faces cannot be added to closed meshes. To draw a face, select the Create Face tool. Click on a boundary vertex that will share the newly created face with an existing face. Add several points in the same view. Click on an ending boundary vertex to close the face (see picture below).
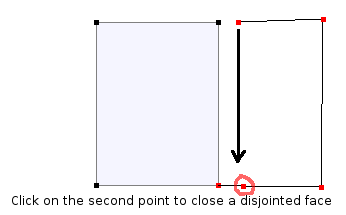
It is also possible to create a disjoitned face rather than to have to add faces to existing faces. You still have to begin the drawing process starting with an existing edge. This allows to locate the new face with respect to the view Z direction (the normal to the screen). Then draw the face vertices as you would normally. To end the face, however, click on the second point, the first vertex which does not belong to the existing mesh. Disjointed faces or patch of faces can be sewn together using the sew tool.
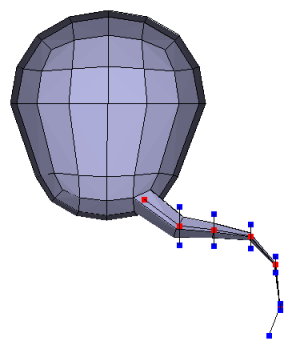
Tentacle tool. Actually, this tool is about faces extrusion along a curve path. Select faces or a group of faces before selecting the tentacle tool. Once the tentacle tool is selected, a red square will show the first point to extrude along. Click several points to define the curve to extrude along. Once you are satisifed with the result, validate your work with the Enter key.
The blue handles can be used to increase or decrease the scaling of a given cross-section. Beware, this setting affects further extrusion so it influences cross-sections after the one modified.
There are also some options you can use:
If you shift-click the first point of the curve, the cross section will remain constant, as opposed to the standard behavior where the cross section decreases along the curve;
Shift-clicking an existing control point allows to reset scaling handles, which is handy when the scale is so small the blue handles can't be dragged anymore;
Ctrl-clicking anywhere cancels the extrusion;
Ctrl-clicking an existing point deletes it.
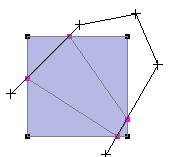
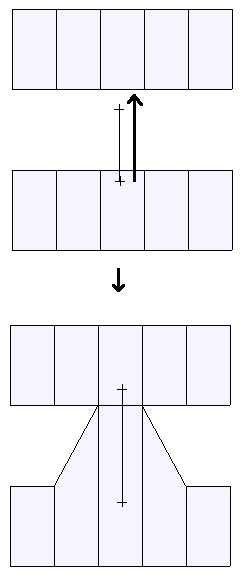
Sew tool. This tool allows to merge edges together thus allowing to join disjointed faces. This tool works in a similar way as the knife tool does. The principle is to draw a line crossing the two edges to merge, as shown in the figure below. The edges crossed by the dragged line are merged, the vertex positions of the second edge to be crossed being kept in the process.
It is also possible to sew two disjointed selections in order to sew several edges at the same time. Selections must be disjointed for the sew tool to work. They can be complete boundary selections, in which case the boundaries must have the same number of edges. The sew tool then operates like Join Boundaries, except boundaries are merged rather than joined.
If you want the vertices of the merged edges to be placed at equal distance from merged edges original vertices, then keep the Shift key pressed as show in the picture below.
Finally, the Sew tool can act as the close boundary command if you keep the Ctrl key pressed while dragging over a boundary edge. Only one boundary edge needs to be crossed when closing a boundary.
Manipulators
Manipulators allow the user to interact with selection for moving, sacling and rotating. As vertices, edges or faces are selected, a three axis system X, Y and Z is displayed as shown below. Clicking and dragging on one of the squares bearing the axis names moves the selection along the axis direction. Dragging the diamond like shape scales the selection along the direction. Finally clicking and dragging along a circle rotates selection about the relevant axis. The grey sphere at the axis origin can also be grabbed and freely moved to achieve freehand translation.
This basic behavior can modified using key modifiers and other mouse buttons. You don't need to know all of them as there are other ways of achieving the sem result, however they can prove to be quite handy shortcuts.
Shift-scaling scales uniformaly along the three directions (and not just one)
Ctrl-scaling scales the manipulators rather than the selection. The manipulator is reset if the editor window is closed
Ctrl-clicking in a scale, move or rotate area activates the value slider at the right of the editor window. It is then possible to enter a precise value for the operation activated.
Shift-clicking on translation labels constrains movement to a step by step motion, step value being equal to the grid subdivision
Ctrl-clicking on a translation label brings the selected axis perpendicular the screen, outwards. Shift-Ctrl-click brings it perpendicular as well but inwards. This provides quick selection for Right, Front and Top views and the like.
Ctrl-clicking on the grey sphere at the axis system center moves the whole manipulators set about feature points. Feature point are : selection center, vertices (when vertex mode is enabled), middle of edges (when edge mode is enabled) and faces centers (when face mode is enabled).
Shift-clicking on rotation handles constrains rotation to steps of 5 degrees
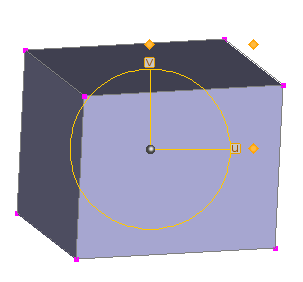
In addition to the XYZ view mode, there are two other wiew modes. View modes are toggled using the W key. The second view mode is called UV and is shown below. This mode purpose is to be able to achieve 2D like edition. Rotation, translation and scaling occurs in the 2D plane. Moreover, a third scaling handle (top right corner of manipulator) allows non uniform scaling in both directions.
The third view mode is called the NPQ mode. N stands for 'normal', meaning the N axis always indicates the normal to the selection. Note that the definition of 'normal direction' is not the same for vertices, edges and faces so the manipulator orientation might change depending on the editing mode being selected. P and Q direction are arbitrarily chosen.
