Previous : Overview
Index
Next : Modules

title.jpg

2.1 Edit menu

edit_menu.jpg
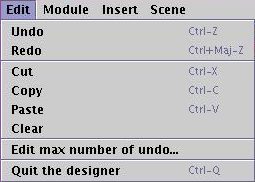
Undo/Redo : Allows to undo any change made to the procedure, or apply back these modifications. The mechanism is not very smart : it saves whole procedures and restores them as needed. Usually, procedures are small objects (3 to 10kb), so keeping some of them in memory has no impact on overall memory use. If you use image maps, however, the size can significantly increase (the procedures store the images, for a start). In this case, it can be advisable to change the undo level to a small number (e.g. 1 or 2). At the moment, the use the Undo command makes it necessary for the program to close all preview and edit windows before restoring back a previous procedure state. This is the only exception to the 'live' character of the preview windows which are otherwise updated when any other editing operation is performed.

Cut/Copy/Paste/Clear : These commands work as usual. All of them except Paste are enabled only if one or more modules are selected. Links alone cannot be copied and pasted.

Edit max number of undo... : Brings a window in which the maximum number of undo operations kept in memory can be edited. A value of 1 means that one undo and one redo are possible.

Quit the designer : Closes the TaPD window editor, cancelling any modification to the procedure. This command is equivalent to  clicking the window close button or clicking the Cancel button in the toolbar.

2.2 Module menu

module_menu.jpg
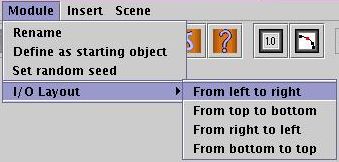
Rename : Enabled if only one module is selected. This command allows to rename the module and to use more explicit module names than just 'coil' or 'tube'. The new name will appear on the edit button of the module.

Define as starting object : Allows to define the currently selected module as starting object of the procedure if you want to change it. Only object modules can be chosen as starting object. There can only be one starting object in a procedure. The starting object module is identified by a green background.
Set random seed : While not exactly an item that works on modules, it seemed right to put it in this menu. This command brings a dialog window in which you can specify the random seed to use in the procedure for object generation. Changing the seed yields a totally different object that still possess the geometric characteristics given by the procedure. You can change the seed to produce several plants or trees using the same procedure, or just because you are not totally satisfied of a particular random detail.

I/O Layout : Using this submenu, it is possible to change the orientation of the module input/output ports. This can help produce a cleaner and easier to understand overall procedure layout.

edit_seed.jpg

Set random seed Dialog

layout.jpg

Different module layouts

2.3 Insert menu

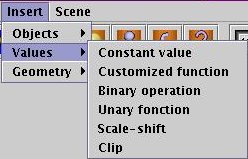
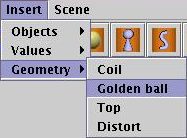
The insert menu allows creation and insertion of modules in the TaPD procedure. There are three items in this menu : Objects, Values and Geometry. You will get acquainted with these different kinds of modules in the next chapter. Each menu item has a submenu which lists the different modules available whithin each category. All submenus insert commands are also available from the toolbar.


insert_menu1.jpg
insert_menu2.jpg
insert_menu3.jpg
This submenu allows insertion of every kind of object module.
This submenu allows insertion of every kind of value module.
This submenu allows insertion every kind of geometry module.

2.4 Scene menu

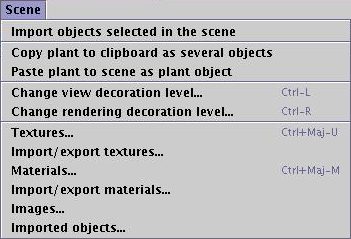
Import selected objects in the scene : after a TaPD object has been created, this command makes it possible to import AoI objects that weren't selected or simply existed when the TaPD object was created. To import AoI objects, select these objects in the AoI main window object list. Come back to the TaPD editor window and use this command. All currently selected objects in AoI main window will appear on the list box of subsequent AoI object module edit windows. It is mandatory that the newly imported objects have different names than those of objects already existing in the TaPD object.

scene_menu.jpg
Copy plant to clipboard as several objectsThis command copies the individual components of the TaPD object in the AoI window clipboard with child dependance built on decoration level. All TaPD editing features are then lost, but it is no longer necessary to use the TaPD (or even to have the plugin installed) to edit objects. After using this command, use the Paste command of the AoI window to get the objects pasted into the scene.

Paste plant to scene as plant object : this command creates a new TaPD object, which becomes the currently edited object. This is useful if you made interesting changes to an edited object but nonetheless want to keep the original object.

Change view decoration level
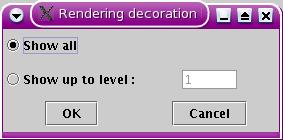
: TaPD objects may contain several thousands of objects. Showing every object in the AoI view windows slow them down to a point where it's no longer possible to further work on the scene. The view decoration level limits the overall number of objects shown in AoI view windows to a specified decoration level. Level 1 corresponds to the starting object alone (trunk or stem), level 2 to starting object plus primary branches or petals, etc. Previews in TaPD editor window always show the full object collection, whatever the view decoration level. The view decoration level has no influence on rendering, i.e. the full object is rendered, unless the rendering decoration level has been modified (see below).

Change rendering decoration level : Same as above, but only for rendering process.

level_dialog.jpg

Rendering decoration level edit dialog

Textures...
: The TaPD stores textures and materials used for decorator and decorated objects. They are independant from the textures and materials that belong to AoI main scene. This command brings out a texture management window, identical to the one found in AoI. Textures can then be deleted, imported from AoI files, etc.

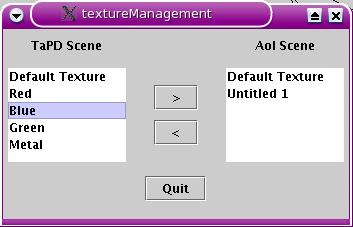
Import/export textures... : This window, shown below, displays two lists : a list of the textures of the TaPD object and a list of the textures of the AoI scene it belongs to. Selecting one or several textures and clicking on one arrow (< or >) button exports the selected texture(s) to the other scene. It is not possible to re-export a texture which has already been exported, even if it has been modified since the first export.

texture_ie.jpg

Texture import/export dialog

Materials and Import/export materials : same as above, but for materials.

Images : brings the images management window.

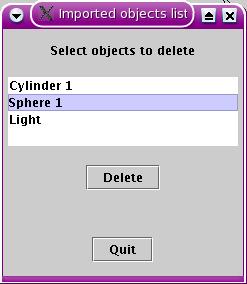
Imported objects... : this command makes it possible to delete some of the previously imported objects. If you delete all of the imported objects, existing AoI objects modules will refuse to open an edit window since there is no objects list to choose from.

objects_list.jpg

Objects list dialog


2.5 Module popup menu

popup.jpg
A popup menu can be triggered through right-clicking on a module background. This popup menu is equivalent to the Module menu and commands only apply to the module on which the popup has been triggered.


Previous : Overview
Index
Next : Modules