Creating a TaPD object is quite simple. Before you start, just ask yourself if you need an AoI object right from the beginning. The 'AoI object' term refers to any any object created within an AoI view window. TaPD objects are objects created within the TaPD editor window. Of course, TaPD objects are AoI objects, otherwise they wouldn't appear afterwards in AoI views and wouldn't get rendered, but they also have special abilities that AoI objects don't have (more about this later on).
So, if you think you need to model a leaf, a trunk or whatever, do it now in AoI as usual and select it in the object list. If you don't particularly need such an object, or just want to have a go at the TaPD editor window, make sure that no object is selected in the object list. Now, whatever choice you made, select the Tree and plant designer menu item in the tools menu. A window appears, similar to the one reproduced in Figure 1.1.
If you didn't select any object before launching the TaPD editor window, you will notice that the first two buttons of the toolbar are disabled (Figure 1.2). These buttons allow you to insert modules that hold AoI objects imported into the TaPD object. Since there is none at this time, these toolbar buttons are disabled. The OK button is also disabled : the procedure is empty and doesn't yet produce a valid object. Click on the tube module, which is the fourth blue button on the toolbar (or alternatively select ->->). A module is inserted in the procedure view of the tabbed pane. It shows a green background that specifies that this object is the starting object for the procedure. Usually, it is the main stem of a plant or the trunk of tree.
Modules can be moved by clicking in their background area (the green border in that case) and dragging. Selection is done in exactly the same way as in the procedural texture editor. This tube module shows three ports : two input ports coloured in magenta and one output port coloured in green. Green ports correspond to object ports whereas magenta ports correspond to value ports. So this module has two value input ports and one object output port. There are also two buttons, the one named tube and the other one with the letter P on it. The first button, if clicked, brings a dialog window allowing the object contained in the module to be edited. The second button brings a preview window which allows not only the object to be previewed, but also in the certain cases the whole TaPD object or parts of it. Right now, let's click on the P button. A preview window appears, showing the tube object (Figure 1.4).
This window consists in a single view of the object, plus some viewing options and a rendering button. This is only a preview window and the generated object can't be modified within this window. Closing the window can also be achieved by clicking its top right close button. The view can be rotated and translated. Zooming in or out is achieved using the Ctrl-.
The preview window can be rendered using the usual default light and camera. Selecting the Render preview button brings out the usual dialog. Often, the camera is too far from the center of the scene. Its location can modified through use of the Camera location button, which is the only way of moving it since there aren't any editing tools in the preview window.
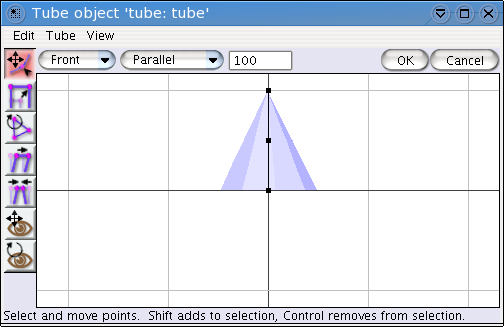
What you can see from Figure 1.4 is that the default tube is far from a stem or trunk shape. The height is too small and the radius at the bottom is too wide. Dismiss or hide the preview and click on the tube module main button. The tube module parameter window appears, as shown in Figure 1.5. Alternatively, select the Parameters tab in the tabbed pane and select the entry named tube, under Tubes. The tube module parameters pane appears on the right part of the Parameters view (Figure 1.6). To get the tube preview centered in the preview pane (as shown on the screenshots), use the to translate the tube object.
The Y-Thickness button and the Tube shape button allow to define the overall shape of the tube. Set texture and Set material buttons are used to assign a texture or a material to the tube object, like in AoI main window. The Deliver duplicates checkbox will be explained later on in the manual, we will ignore it for the time being. Finally, the three usual buttons OK, Apply and Cancel can be found at the bottom of the dialog (or Validate, Test and Revert for the parameters view). Let's concentrate on the shape of the tube. Clicking on the Tube shape button brings the window shown in Figure 1.7.
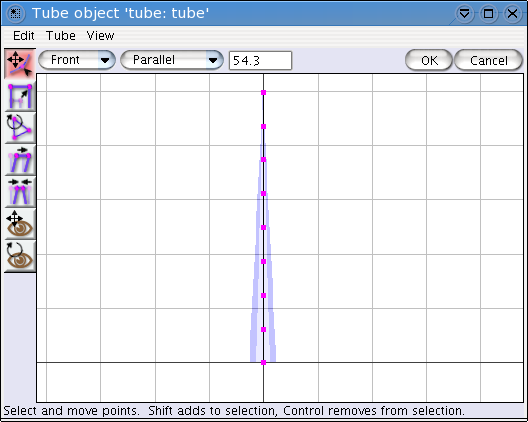
This window is in fact the tube editor window. Grids have been added to show that the base vertex lies at coordinates (0,0,0). You can do whatever you want with the other vertices, but keep that one coincident with the local coordinate system origin. Selecting all vertices and resizing the tube with the top handle gives the result shown in Figure 1.8.
Note that there are only three vertices on the curve that define the tube shape. These control points are all you get in terms of tube distortion control upon applying a distortion using a coil or distort module later on in the procedure. You can have more control points through subdivision of the tube curve in the tube editor window. Beware, though, that more control points mean that the tube object uses more memory. The number of control points must thus be adapted to the use you intend to make of the tube. For major branches to which branching effects will be applied, a fair number of control points is needed (maybe up to twenty). For small branches to which no further branching is attached four or five vertices will be sufficient. If a preview shows that a particular kind of tube object does not possess enough control points, simply edit the tube and subdivide the curve. Another point is that there is no reason why the points should be evenly spaced. If the procedure design is such that a tube needs more control points in some ranges of the curve, simply subdivide these parts of the tube. Since in our example the tube will remain straight, we will keep the simple three points design.
Next, we are going to change the radial size at the base of the tube. Normally, this change is carried out setting the thickness at each control point of the tube. However, this procedure can quickly get tedious if you happen to have a more than a few control points : that's where the Y-thickness function comes in. Close the tube editor window and click on the Y-thickness button. A new window appears showing a customised function taken from the procedural editor customised function module (Figure 1.9). Bring the first control point to 0.5, as shown in the figure. You can use this function to set any shape along the tube axis. It overrides the thickness property of the usual AoI tube. If the function shape shows abrupt variations, the control point density of the tube must be dense enough for these changes to actually be taken into account in the final tube shape.
What next ? Insert a coil module (first button of the second button group in the toolbar, or the appropriate menu command). Select, copy and paste the tube module. The copy has a blue background, which is the colour for object modules that are not the starting object of the procedure. Look at Figure 1.10, and set up links accordingly. When the line you are dragging from a port of a module correctly ends on a compatible port of another module, a kind of magnetic effect tells you that you can release the mouse button to establish the link.
Click on the preview button of the starting object, the green tube module. It shows the result of this three modules procedure. The starting object preview button is special : it shows the whole object generated. The preview button of a usual object module, like the blue tube module, shows only the object defined by the module. The preview button of the coil module shows the object generated up to the coil module. Since there is nothing after the coil module in the procedure, it shows the same object as the starting object tube module.
What the previews (Figure 1.11) tells us is that :
The tubes used to decorate are too big;
They have a constant size along the vertical axis of the "trunk", which is not what we want.
To address the first point, we will plug a constant value to the size entries of the tube module. Click twice on the constant value module button (first button of the black buttons group in the toolbar) to insert two value modules and enter a value of 0.4 for the R size input port and 0.6 for the Y size input port. Setup links as in the figure Section 2. Next add a customised function (second black button of the toolbar) and plug it like shown in the screenshot. If you want to know what is the nature of each port in a module, let the mouse stay awhile on a port and a tooltip will tell you what this port is for. Let's see the result of our work (Figure 1.13).
Not too bad, but we could do with curved branches. Click on the tube button of the decorator tube module (the blue one), click on the Tube shape button editor window and select all vertices. Subdivide the curve twice (Figure 1.14).
Now, click on the coil button of the coil module. Enter a value of 70 degrees in the vertical angle input box, as shown in Figure 1.15. Select the second pane named TaPD object parameters, and enter a value of 35 degrees as shown in the two figures. This second pane is devoted to distortion parameters that can be applied only to TaPD objects. Specifying parameters in this pane for a pure AoI decorator object has no effect.
Clicking on the preview button of the starting object yields the result shown in Figure 1.17. Even if it doesn't look like a tree, changing some more parameters in the coil module could make the difference. It is now the time to click on the OK button of the toolbar to get a proper object in the AoI main window (Figure 1.18). This object can be moved, rotated, edited, etc. like any other AoI object. However, it cannot be resized (yet). To change its size, it must be edited and the size of each individual object module changed accordingly.


